FREE SHIPPING

On all Solinst products and accessories

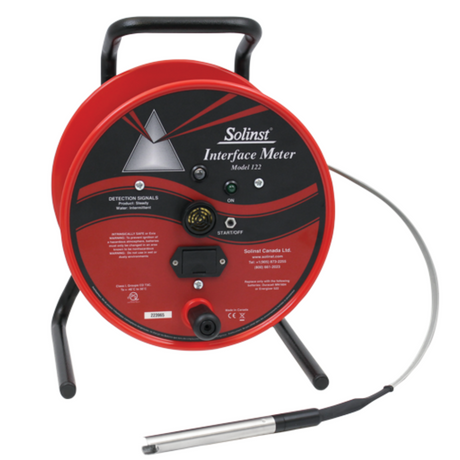
Solinst Model 122 / 122M Interface Meter SPARE CSA P8 Probe

$259.35 $273.00
Shipping calculated at checkout.
No reviews


Description

Usually ships within 1-2 weeks
Replacement Solinst P8 probe for Model 122 and 122M Interface Meters.


Check out the following probe replacement guide:


Tools and Materials Needed

  • 122/122M Replacement P8 Probe Assembly
  • Includes two replacement #V013 O-Rings
  • Tweezers (if required)

Instructions

Note:

Before attempting probe replacement, please make sure the Interface Meter is properly grounded. Attach the grounding cable clip to a metal well casing or other suitable grounding rod.


    1. Make sure the Interface Meter is turned off.
    2. To remove the old probe, twist the probe counter-clockwise and slowly pull it away from the tape seal plug.
    3. It will take some force to pull past the o-rings on the tape seal plug. Ensure not to overextend the wire connectors inside the probe.

Note:

Older tape seal plugs only have one o-ring.


be careful not to overextend the wire connectors inside the probe when pulling apart the solinst model 122 p8 interface meter probe from the tape seal plug assembly


    1. Remove the two connectors from the brass tubes.
    2. Remove the old o-rings. Use your fingers to push the o-rings up and roll them off the tape seal plug.

Note:

To avoid damage to the tape seal plug, do not use a sharp tool to remove or install the o-rings.


do not use sharp tools when removing the oring from the solinst tape seal plug instead use your fingers


    1. Use your fingers to install the new o-rings in the grooves. You can lubricate them with a bit of water if required.
    2. Lay the tape and tape seal plug so the numbers on the tape are facing up.
    3. If required, use tweezers to carefully pull the green and white wire connectors from the replacement probe body.
    4. To attach the new probe, connect the green wire to the brass connector on the top of the tape seal plug and the white wire to the bottom brass tube. Ensure the connectors are pushed all the way onto the brass tubes.
    5. Keeping the wires connected, slowly twist the probe up to two times. This shortens the wires and allows them to tuck easier into the probe body.

Note:

To avoid any nicks, make sure the wires are tucked back into the probe body when pushing the probe onto the tape seal plug.


to avoid any nicks make sure the solinst 122 interface meter wires are tucked back into the probe body when pushing the probe onto the tape seal plug


  1. Line up the indents in the probe with the grooves in the tape seal plug. Push the probe past the o-rings, then twist the probe clockwise until the probe seats on the tape seal plug.
  2. With Probe in a glass of tap water and product (i.e. lamp oil), turn the Interface Meter On. A steady tone and light indicates a product, while an intermittent tone indicates water. If the buzzer or light do not activate, check the Probe connections.


Payment & Security

Payment methods

  • American Express
  • Apple Pay
  • Diners Club
  • Discover
  • Meta Pay
  • Google Pay
  • Mastercard
  • PayPal
  • Shop Pay
  • Venmo
  • Visa

Your payment information is processed securely. We do not store credit card details nor have access to your credit card information.

Have questions? Contact us using the form below.

Solinst

Solinst Model 122 / 122M Interface Meter SPARE CSA P8 Probe

$259.35 $273.00

Usually ships within 1-2 weeks
Replacement Solinst P8 probe for Model 122 and 122M Interface Meters.


Check out the following probe replacement guide:


Tools and Materials Needed

Instructions

Note:

Before attempting probe replacement, please make sure the Interface Meter is properly grounded. Attach the grounding cable clip to a metal well casing or other suitable grounding rod.


    1. Make sure the Interface Meter is turned off.
    2. To remove the old probe, twist the probe counter-clockwise and slowly pull it away from the tape seal plug.
    3. It will take some force to pull past the o-rings on the tape seal plug. Ensure not to overextend the wire connectors inside the probe.

Note:

Older tape seal plugs only have one o-ring.


be careful not to overextend the wire connectors inside the probe when pulling apart the solinst model 122 p8 interface meter probe from the tape seal plug assembly


    1. Remove the two connectors from the brass tubes.
    2. Remove the old o-rings. Use your fingers to push the o-rings up and roll them off the tape seal plug.

Note:

To avoid damage to the tape seal plug, do not use a sharp tool to remove or install the o-rings.


do not use sharp tools when removing the oring from the solinst tape seal plug instead use your fingers


    1. Use your fingers to install the new o-rings in the grooves. You can lubricate them with a bit of water if required.
    2. Lay the tape and tape seal plug so the numbers on the tape are facing up.
    3. If required, use tweezers to carefully pull the green and white wire connectors from the replacement probe body.
    4. To attach the new probe, connect the green wire to the brass connector on the top of the tape seal plug and the white wire to the bottom brass tube. Ensure the connectors are pushed all the way onto the brass tubes.
    5. Keeping the wires connected, slowly twist the probe up to two times. This shortens the wires and allows them to tuck easier into the probe body.

Note:

To avoid any nicks, make sure the wires are tucked back into the probe body when pushing the probe onto the tape seal plug.


to avoid any nicks make sure the solinst 122 interface meter wires are tucked back into the probe body when pushing the probe onto the tape seal plug


  1. Line up the indents in the probe with the grooves in the tape seal plug. Push the probe past the o-rings, then twist the probe clockwise until the probe seats on the tape seal plug.
  2. With Probe in a glass of tap water and product (i.e. lamp oil), turn the Interface Meter On. A steady tone and light indicates a product, while an intermittent tone indicates water. If the buzzer or light do not activate, check the Probe connections.


View product